Sale
Sold out

Organic seeds, Untreated seeds
Apiaceae
Root vegetables seeds
Untreated carrot colour mix on tape (Daucus carota)
Product code : 69-1802-01N
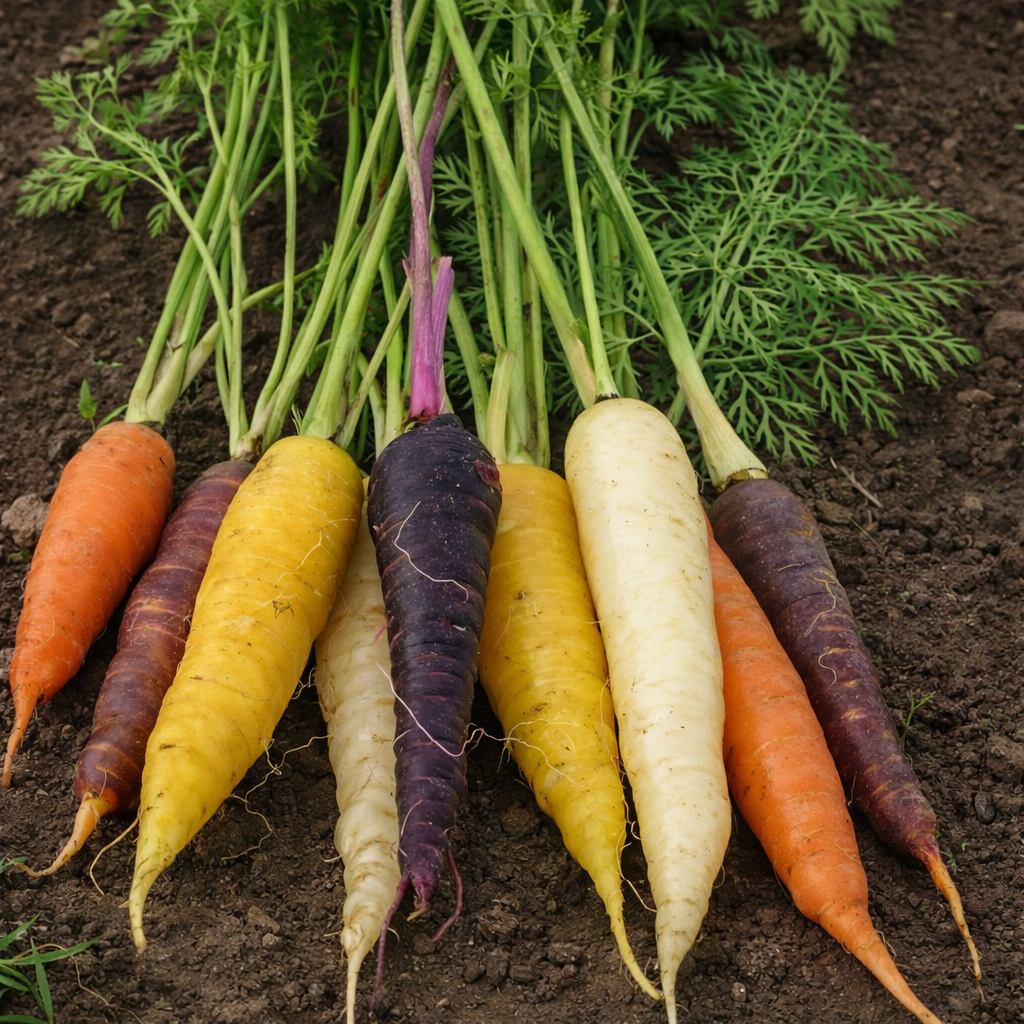
This W.H. Perron mix contains approximately 425 untreated carrot seeds pre-sown at optimal density on 6 metres of biodegradable tape. The product is not advertised as organic. Cylindrical white, yellow, pink, orange, red, and purple roots reach approximately 20 to 35 cm depending on variety and mature in 65 to 72 days. Lay the tape in a 6-mm furrow, moisten it, then cover with a thin layer of potting soil; keep rows 40 cm apart. Maintain surface moisture through emergence. The tape simplifies handling of small seeds, limits overdosing, and readily creates a multicoloured row for fresh or cooked harvests. Pick each colour while roots remain young and tender.
- Quantity
- Approximately 425 seeds on a 6-metre biodegradable tape
- Exposure
- Full sun
- Life cycle
- Annual
Discover the plant
Common nameUntreated carrot colour mix on tape
FamilyApiaceae
GenusDaucus
Speciescarota
CultivarColour Mix
TypeOrganic seeds, Untreated seeds
Botanical nameDaucus carota
Untreated carrot colour mix on tape (Daucus carota) combines white, yellow, pink, orange, red, and purple roots in one package. Carrots are cylindrical, reach approximately 20 to 35 cm depending on variety, and mature 65 to 72 days after sowing. Their necks generally measure 2 to 3 cm. W.H. Perron packet 69-1802-01N contains approximately 425 seeds pre-sown on 6 metres of biodegradable tape. The formulation is untreated and not organic. This mix brings varied colour to bare vegetables, roasted dishes, preserves, and pickles while simplifying row establishment through preset density.
Prepare fairly rich, deep, loose, stone-free soil in sun or light partial shade. Make a small furrow 6 mm deep, cut tape to the required length, lay it flat, moisten it, and cover with a thin layer of potting soil. Keep rows 40 cm apart. Seeds are already positioned at optimal density between two thin layers of biodegradable fibre, so avoid moving the tape with a forceful water stream. Keep the surface consistently moist through emergence. Sow in early May, mid-June, or early July, with possible successions every two or three weeks through late July. Label each section before covering it.
Avoid fresh manure and recently incorporated green manure because they promote foliage at the expense of roots. Weed shallowly and draw a little soil around exposed shoulders to prevent greening. Length varies among colours, soils, and conditions, so lift one sample before harvesting the entire row. Harvest young when each variety reaches its useful size without waiting for excessive enlargement. W.H. Perron lists leek, onion, pea, radish, and tomato among companions, while beet, dill, garlic, mint, and parsley are rivals. Cool roots promptly and keep colours together or separate according to culinary use. Remove broken or diseased carrots before storage.

Sowing guide
It all startswith a seed.
Sowing depth
6 mm
Spacing / density
Optimal density preset on tape; rows spaced 40 cm apart
Germination temperature
10 to 25°C
Germination time
5 to 12 days depending on temperature and moisture
Sowing period
Direct sowing in early May, mid-June, or early July; succession sowings every 2 to 3 weeks through late July
Propagation
Seed
Growing method
Loosen soil deeply and remove stones, hard clods, and debris that could distort roots. Avoid fresh manure and recently incorporated green manure. Make furrows 40 cm apart in sun or light partial shade. Sow tape-mounted seed 6 mm deep, firm gently, and moisten without washing rows away. Keep the surface cool until emergence so the biodegradable tape remains moist and in firm contact with soil. When first true leaves appear, retain the tape’s preset density by cutting or carefully removing extras. Weed shallowly and maintain consistent moisture. Draw a little soil around every exposed crown to prevent greening. Label each succession made at two-to-three-week intervals. Begin checking near 65 to 72 days, lift one sample root, and harvest when carrot colour mix reaches approximately 20 to 35 cm while still firm and tender. Loosen soil before pulling to prevent breakage. Cool harvested roots promptly. Keep packet and row labels, compare moisture at several points, and resow only spaces that are truly empty. After heavy rain, correct exposed shoulders. Clean tools after handling a diseased plant, keep paths free of compaction, and cool harvested roots promptly. Record sample length, diameter, sweetness, and breakage for every sowing date before adjusting the next schedule.
Soil and care
The right care,at the right time.
Soil pH
6.0 or higher
Minimum temperature
Tolerates cool temperatures; protect from hard frost
Care level
Easy
Watering
Keep the soil evenly moist from sowing through harvest without saturating it. Water deeply when the surface begins to dry, and monitor more often in containers or hot weather. A long dry spell followed by heavy rain may result in hard, woody, or less colourful roots; consistency matters more than occasional very heavy watering. Apply water to the soil rather than the foliage, and check moisture a few centimetres below the surface before watering again.
Soil type
This variety prefers soil or growing medium that follows the drainage and texture information published for Untreated carrot colour mix on tape. Untreated carrot colour mix on tape is a root vegetables variety offered as seed for gardeners who want clear, practical product information. The packet contains approximately 425 seeds on a 6-metre biodegradable tape, and the formulation is organic seeds, untreated seeds.
Fertilization
Before sowing, incorporate a moderate layer of mature compost or fully decomposed manure. Already fertile soil needs little additional fertilizer. Avoid high-nitrogen feeding, which encourages abundant leaves at the expense of roots. If growth becomes pale, use a balanced vegetable fertilizer sparingly, then water to distribute the nutrients through the root zone. Never apply fresh manure immediately before sowing, because overly aggressive fertility may reduce root quality and interfere with even root formation. overall
Moisture
Consistent moisture without standing water
Seasonal care
In spring, wait until soil can be worked, loosen it deeply, and remove stones. Avoid fresh manure and prepare 6-mm furrows spaced 40 cm apart. Sow carrot colour mix in early May, label the date, and keep the surface moist while biodegradable tape softens. After emergence, retain the tape’s preset density as soon as seedlings can be handled without damage. Weed shallowly. In June, sow another short row for fall; in July, make a final sowing for young tender carrots if needed, then stop by month-end. Through summer, check moisture several times weekly, draw soil over exposed crowns, and inspect foliage. Remove severely diseased plants and clean tools. Near 65 to 72 days after each sowing, lift one sample root. Harvest at characteristic size before excessive enlargement. In fall, trim tops, cool sound roots, and separate broken specimens. Clean the row, record each succession’s yield, and plan rotation away from other Apiaceae. Store labels with notes for next season. After heavy rain, inspect erosion, cover exposed shoulders, and confirm furrows are not saturated. During dry periods, water in the morning and compare moisture in several places. Clean crates before harvest and promptly remove every soft or diseased root. Record pest pressure, root forking, green shoulders, flavour, and average dimensions so soil preparation and irrigation can improve. Never carry compacted or diseased soil into the next rotation bed.
Container growing
A garden,within reach.
Recommended pot size
30 L or larger; minimum depth of 25 to 30 cm
Use a stable planter at least 30 cm deep, preferably 35 cm so 20-to-35-cm roots can develop, with several drainage holes. Fill with deep, loose, stone-free potting mix enriched with mature compost. Mark rows, sow tape-mounted seed 6 mm deep, and moisten gently. After emergence, retain the tape’s preset density by cutting extras at mix level so neighbouring roots are not displaced. Place the container in sun or light partial shade and lift it on feet. Check moisture daily during heat, water until excess drains, and empty the saucer. Very thin mulch limits evaporation without burying seedlings. Draw a little mix over exposed crowns. Rotate the planter when light is uneven and harvest near 65 to 72 days before roots press against walls. After the season, remove debris, wash the pot, and replace mix before another apiaceous crop. Keep drainage outlets clear after every storm. Label every sowing date, protect container walls from excessive heat without depriving foliage of light, and prepare a chilled crate before harvest. Replace compacted mix instead of relying on extra fertilizer. Inspect beneath the planter after rain, keep labels visible, and harvest sample roots carefully before deciding whether the entire succession is ready.

Bloom and dimensions
Its place,in your garden.
Mature height
Foliage height varies depending on the varieties in the mix
Width / spread
Collars about 2 to 3 cm; pre-set density on tape
Flower color
Greenish
Foliage color
Green foliage; white, yellow, pink, orange, red, and purple roots
Foliage type
Rosette of broad leaves with coloured petioles
Growth rate
Fast
Growth habit
Compact rosette above a round root
Bloom period
Harvest before bolting; flowering normally occurs in the second year after a cold period. carrots are botanically biennial but are grown as annuals for their roots and leaves. Prolonged exposure to cold can sometimes encourage premature bolting. Remove plants that develop a flower stalk, because their roots quickly lose tenderness and culinary quality once reproductive growth begins. and flavour at harvest time
Fruiting
Mixed Carrot on Ribbon (Daucus carota) brings together white, yellow, pink, orange, red, and purple roots in a single package. Avoid fresh manure and recently incorporated green manures, which promote foliage growth at the expense of root development. Length varies by color, soil, and conditions; pull a test root before harvesting the entire row.
Days to maturity
Approximately 65 to 72 days after sowing
Harvest
Harvest young when cylindrical roots reach approximately 20 to 35 cm depending on variety and conditions.
Garden associations
In goodcompany.
Companion plants
W.H. Perron lists wormwood, bean, chicory, chives, coriander, endive, ground cherry, leek, onion, pea, pepper, radish, rosemary, sage, salsify, shallot, and tomato as companions. Keep them outside the tape line and position tall crops without shading rows. Coordinate their removal so carrot colour mix roots are not disturbed. Companion planting complements bed planning but does not replace rotation, shallow weeding, or consistent moisture. Preserve access for inspecting preset density, crown hilling, and sample harvests without stepping into prepared soil. Maintain labels and open access carefully.
Recipe idea
From the gardento your plate.
Edible parts
Roots and leaves
Prepare honey-and-thyme roasted carrot colour mixs. Scrub approximately 700 g of young roots, peel only when necessary, and halve larger carrots lengthwise. Toss with one tablespoon oil, one teaspoon honey, one-half teaspoon thyme, a pinch of salt, and pepper. Spread in one layer on a baking sheet and roast at 210°C for about twenty to thirty minutes, turning halfway, until a knife enters easily and the edges are browned. Add one teaspoon lemon juice after cooking and serve hot. For a vegan version, replace honey with maple syrup. Use a clean tray, refrigerate leftovers promptly, and label the container with the date. Adjust timing to the actual root diameter. Keep carrots separate from utensils used for bare meat and discard spoiled portions before cooking. Serve with a warm grain or green salad. When scaling the recipe, measure oil, sweetener, and salt consistently. Taste after roasting before adding more seasoning, and use damaged roots only when every affected portion can be removed safely.
Frequently asked questions
Your questions,answered.
When can the carrot tape be installed?
Direct-sow in early May for an early crop, mid-June for fall harvest, or early July for young tender carrots late in the season. W.H. Perron also recommends successions every two or three weeks through late July. Place tape-mounted seed 6 mm deep, keep rows 40 cm apart, and maintain surface moisture. Label every date because maturity near 65 to 72 days is counted after sowing. Soil should be deep, stone-free, and prepared before the first succession; avoid compacting it during later sowings. Stop after late July so roots have enough season to develop under local conditions. Record the actual emergence date as well.
Which light exposure suits Untreated carrot colour mix on tape?
Light exposure for Untreated carrot colour mix on tape should follow the published variety information and the light actually available in your garden. Untreated carrot colour mix on tape is a root vegetables variety offered as seed for gardeners who want clear, practical product information. The packet contains approximately 425 seeds on a 6-metre biodegradable tape, and the formulation is organic seeds, untreated seeds. For best results, follow the sowing, light, and spacing information associated with this variety. You can adjust care to your soil, weather, and observed growth without exceeding the plant’s actual needs. A suitable mulch can help stabilize moisture, reduce soil splash, and limit competition from weeds around established plants.
How should Untreated carrot colour mix on tape be watered?
Before watering Untreated carrot colour mix on tape, check the growing medium and foliage so frequency reflects current conditions. Untreated carrot colour mix on tape is a root vegetables variety offered as seed for gardeners who want clear, practical product information. The packet contains approximately 425 seeds on a 6-metre biodegradable tape, and the formulation is organic seeds, untreated seeds. For best results, follow the sowing, light, and spacing information associated with this variety. You can adjust care to your soil, weather, and observed growth without exceeding the plant’s actual needs. A suitable mulch can help stabilize moisture, reduce soil splash, and limit competition from weeds around established plants.
How can green carrot shoulders be prevented?
When the top of a carrot root is exposed to light, it may turn green and suffer sunburn. Gently draw a thin layer of loose soil around visible shoulders without burying foliage or damaging roots. Check after heavy rain or irrigation that moves soil. Very thin mulch may also reduce erosion but must not impede emergence. Keep rows accessible so exposed areas can be corrected promptly. At harvest, trim away green tissue generously if its flavour is strong. Planting 6 mm deep and levelling soil well reduce later corrections. Never mound wet, compact soil tightly against the foliage crown. Inspect again after every strong storm.
Can the carrot tape mix be grown in a container?
Yes, provided the planter accommodates the longest roots in the mix, which may reach approximately 35 cm. Choose a container at least 40 cm deep with several drainage holes, then fill it with loose, stone-free potting mix enriched with mature compost. Cut the tape to fit the available width, lay it flat 6 mm deep, moisten it, and cover it thinly. Preserve its preset density and maintain consistent moisture without leaving water in the saucer. Place the container in sun or light partial shade. Cover exposed shoulders and begin checking roots between 65 and 72 days because the different colours may reach useful size at slightly different times. Keep drainage outlets clear after every heavy rain.
For a great start to your seeds
The right extras.Right here.
Seed Starting Soil
Shop the collectionSeed starting supplies
Shop the collection